Collecting business requests in SharePoint and automatically pushing into Project Server
By blurg64
At SharePoint Saturday Toronto, I presented one of my favourite sessions on SharePoint Governance and Lifecycle Management using Project Server 2010, based on Christophe Fiessinger’s and Scott Jamison’s session from TechEd NA 2011. I’ve delivered this session three or four times now, showing how organisations can benefit from using Project Server to collect business requests and guiding them through a process to successfully collect information, objectively determine which project to implement and then assist in the implementation.
Each time I have delivered the session, I have been asked if there were ways to collect the initial business requests outside of Project Server, in a SharePoint list for instance, reducing the need to licence and more importantly train all users within an organisation that may wish to lodge a business request. So, for SharePoint Saturday Toronto I decided to implement an interface that allows the business requests to be created initially in a SharePoint list and then via a workflow pumped into Project Server for the Project Server governance process to be applied.
This post shows you how you can implement it too. For this example, I will be using Nintex for the workflow component (disclosure, I work for Nintex), but you could also use a SharePoint Designer built workflow with the Christian Glessner’s iLSP SharePoint Designer Add-ons and a little elbow grease.
At a high level the solution has three components:
- A SharePoint list that will be used to capture the business request. The list should be configured to capture the relevant items for the business request. In this example, the list requests the project name and a description, but you could extend this to capture other information such as anticipated budget, business need etc;
- A default Enterprise Project Type configured to use the SharePoint Governance and Lifecycle Management demand management workflow. This EPT should also have a default Project schedule template associated; and
- A list workflow associated with the SharePoint list above that will be used to call the PSI to create the project.
The list
Configure a SharePoint list to capture the information you want to capture. In this example, I have only captured two fields, as the rest will be captured within Project Server.
Both fields are set to be mandatory and the title field has been set to enforce unique values.
The EPT
The Governance and Lifecycle Management white paper and databases guide you through the process of configuring a demand management workflow and EPT. For the list workflow to create a project automatically, it is essential to make sure this EPT is set as the ‘default’ and that a Project schedule template has been uploaded and associated with the EPT.
Before building the workflow, we need to know some information about the project schedule template, this will be used by the workflow to create the project. Each project template is stored within the DRAFT Project Server database and can be extracted with the following query:
SELECT PROJ_NAME, PROJ_UID FROM MSP_PROJECTS WHERE PROJ_TYPE = 1
Write down the PROJ_UID of the relevant record for the Project Template you associated with the default EPT.
The Workflow
The key component of the process is the workflow that will take the list item and create a project in Project Server. As I mentioned above, in this example I will use Nintex Workflow & Nintex Workflow for Project Server as it has Project Server specific actions, but you can achieve a similar outcome in SPD with a little more effort.
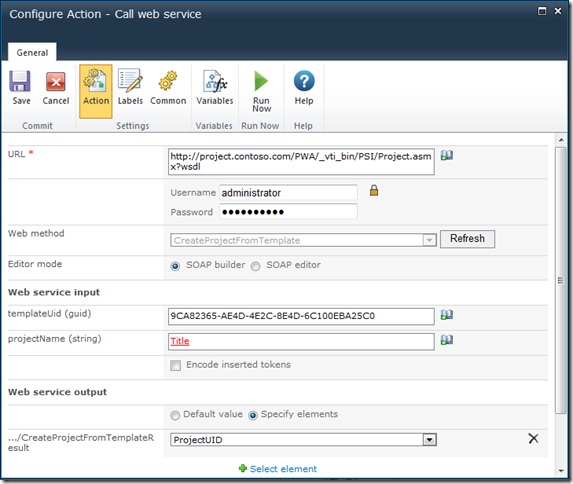
The workflow itself consists of only three actions, the first action ‘Call Web Service’ is used to call Project Server’s PSI and specifically the Project web service and the CreateProjectFromTemplate web method. This method creates a project within Project Server based on a specific project schedule template.
The action should be configured as below, ensuring you change the URL of the web service, credentials and Template GUID to match your environment.
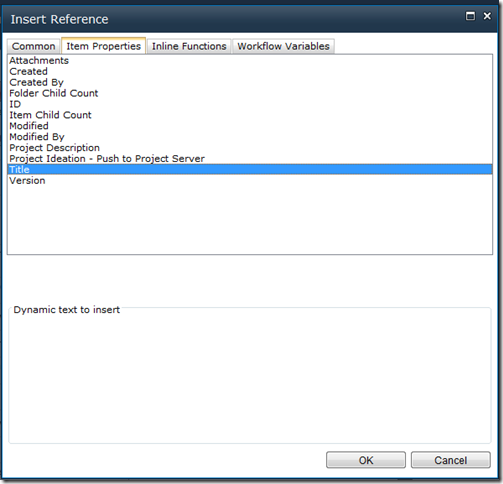
The projectName field above is using the Title variable. A great thing about Nintex is that you have access to the list context information by clicking on the lookup icon as below:
The final part of the configuration is to capture the UID of the project that is created. When CreateProjectFromTemplate is called, if the method is successful it will return the UID of the created project in an XML envelope.
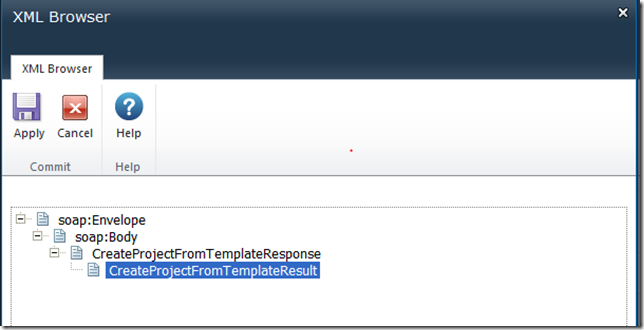
The Call Web Service action can listen for the response and parse it. To do so, click on Specify Elements and then Select Element.
A XML browser dialog will be displayed allowing you to select which item in the response to read, in this case we are interested in the CreateProjectFromTemplateResult, so select it and click on Apply.
Choose to save the returned value into a variable called ProjectUID, this will be used later.
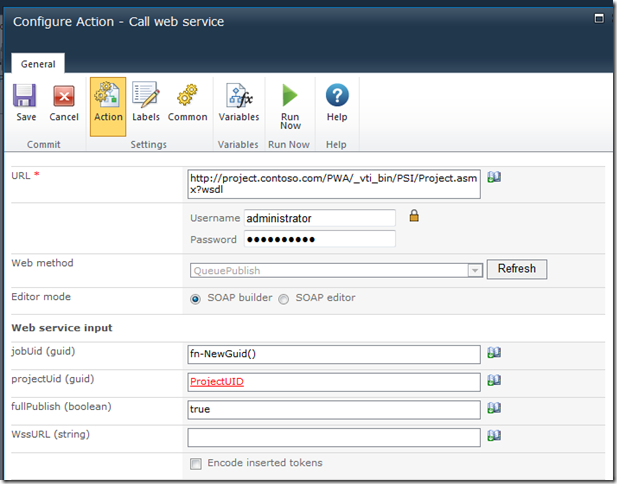
The second action is also a Call Web Service action, this time used to Publish the Project in Project Server, up until now our project has resided in the Draft database, performing this publish will make sure it is published and therefore visible in PWA.
Like the previous action, configure the web service to call the Project PSI server with the relevant URL and credentials.
For this action, choose the QueuePublish method. This method has different parameter requirements:
- jobUid – A GUID used to identify the job, in this case use the inline function fn-NewGuid()
- projectUID – the UID captured in the ProjectUID variable prior
- fullPublish – true
- WssURL – leave blank
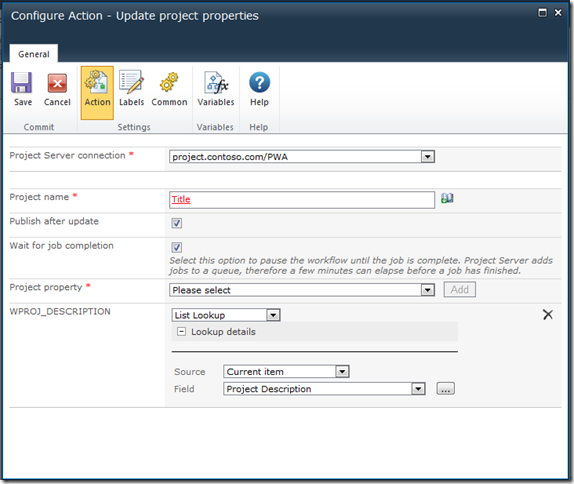
Once these two actions are run, a project will be created in Project Server using the default EPT and schedule template, all that is needed to do is to copy the other fields from the list into the project custom field using the last action ‘Update Project Properties’ from Nintex Workflow for Project Server that provides a simple wrapper for updating project custom fields. If you decide to use SPD, you would need to perform a raw PSI call to update the property making sure you have created a valid XML message (Fiddler will be your friend here, but a word of warning, it is not simple).
Configure the action as shown below, ensuring you select Title from the lookup field for the Project Name and then choosing to update the WPROJ_DESCRIPTION field with a list lookup against our SharePoint list, the item we are starting the workflow against (our project idea) and relevant field (in this case the Project Description field).
If there were other fields you wished to push into Project Server, they can be chosen in the Project Property drop down.
Finally, configure the action to ‘Publish after update’ and to ‘Wait for job completion’.
The completed workflow should look like this:
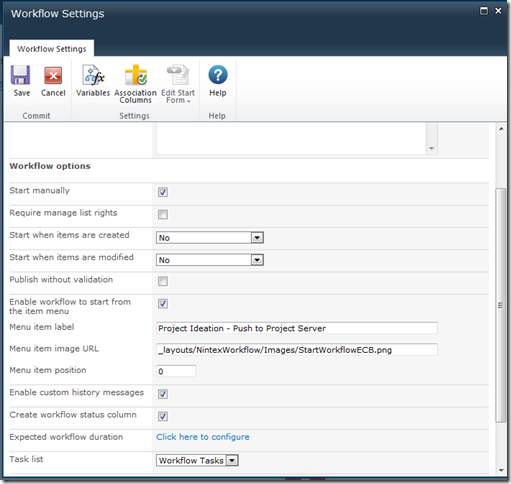
All that is needed to complete the workflow is to modify the workflow settings to allow it to be manually started, and to add it to the list item context menu as follows:
Then publish the workflow and you’re ready to start pushing your project ideas from a SharePoint list into Project Server ![]()
Of course, what I have shown you above is the tip of the iceberg, with a little more work you could:
- extend the workflow to add in some approvals before the business request is pushed into Project Server, allowing people like team leads or managers that may not necessarily need access to Project Server to review, add additional information and approve or reject the request;
- configure the demand management workflow to push updates about where the business request is back out to the SharePoint list; and
- add additional fields to the list that are pushed through into Project Server custom fields at project creation time.
- Governance
- Lifecycle Management
- Nintex
- Project Server 2010
- SharePoint Designer
- SPD
- SPSToronto
- Workflow


